
Aftermarket Fairing Fitment and the Bolt Hole Problem
Aftermarket fairing fitment describes how closely a replacement or custom fairing set lines up with a motorcycle’s frame, subframe brackets, and neighboring bodywork. Riders buy these kits after a crash, for a track build, or just to change how a bike looks. The complaint that comes up most often is that bolt holes misalign: the pre-drilled openings in the new plastic do not match the mounting points on the frame.
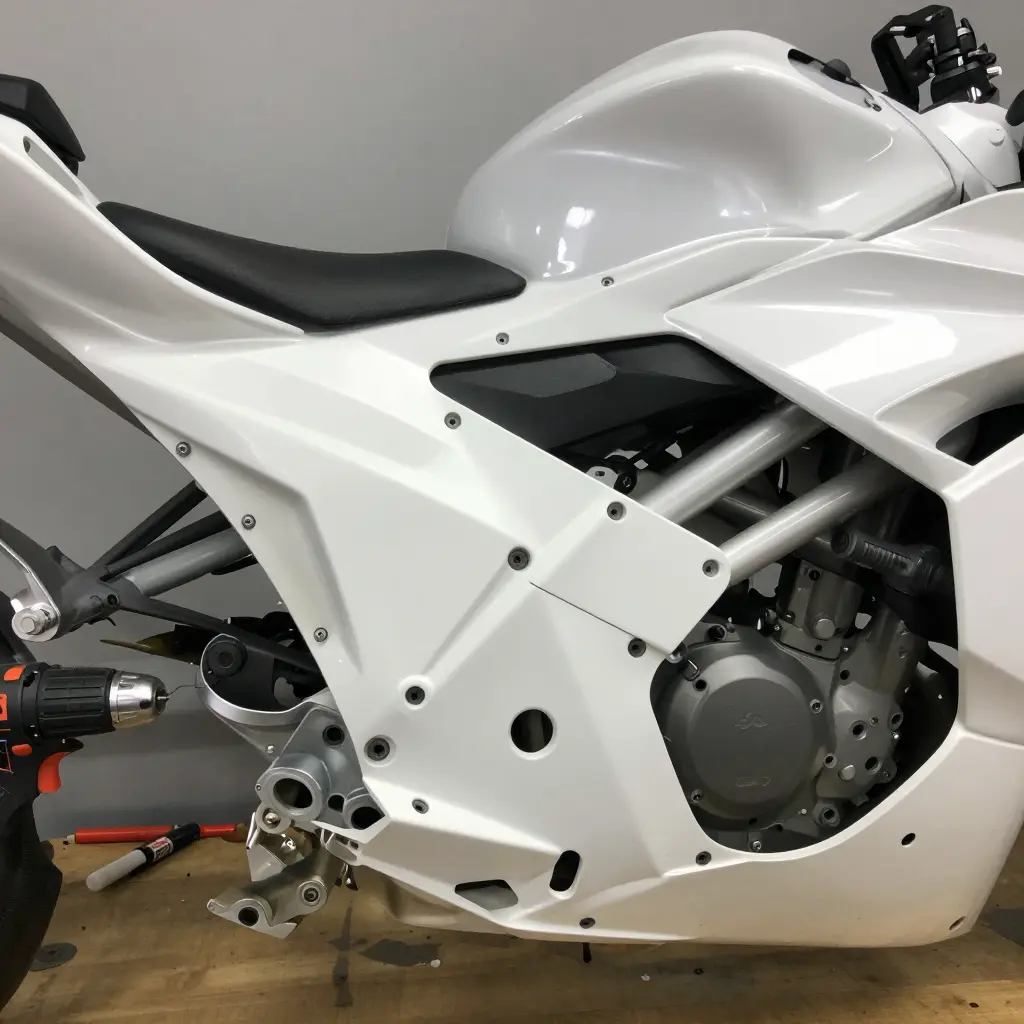
Why This Happens So Often
The trouble starts at the mold. Most aftermarket panels are copied from OEM geometry rather than made on the original tooling, so dimensional errors are built in from the beginning. Fiberglass and ABS plastics can also warp while cooling, in storage, or in transit, and different brands hold to different tolerances. A motorcycle fairing is flexible and made of many interlocking panels, so even a few millimeters of drift is enough to stop a bolt from threading.
Why You Should Fix It Before Painting
Misalignment is cheaper to solve on bare plastic than on a finished part. If a painter sprays a panel while the holes are still off, the cured paint and clear coat must be forced, re-drilled, or thrown away, and any touch-up will show. Correcting fitment first means every hole, tab, and panel gap is set before a single coat goes on, so the paint lands on a part that genuinely bolts up. That order saves money, time, and patience. If you are already sourcing and retrofitting project bikes, treating fitment as a prep step rather than an afterthought will save you the same trouble later.
What follows covers the causes of misaligned fairing bolt holes, how to diagnose them on your own bike, and the practical fixes that get panels painting-ready.
Why Aftermarket Fairing Bolt Holes Misalign: A Root-Cause Breakdown
Misaligned bolt holes are the most common complaint from riders installing new bodywork, and knowing why they happen saves time before you reach the paint booth. The cause is rarely a single flaw. It is usually several small deviations stacking on top of one another. Below are the technical reasons behind poor aftermarket fairing fitment.
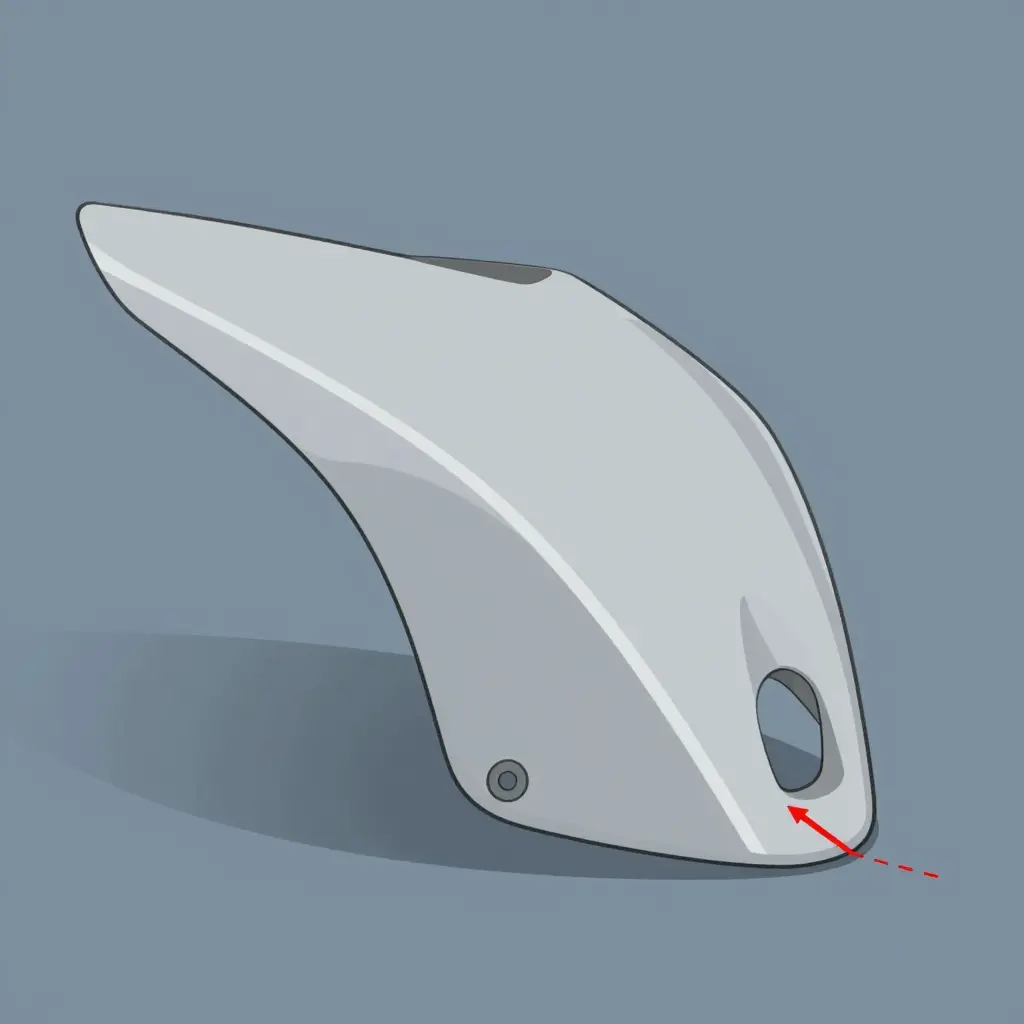
Manufacturing Tolerances and Mold Wear
Every part made from a mold carries a tolerance range, and aftermarket producers often work with looser limits than OEM factories. As a mold cycles thousands of times, the tooling wears and dimensions gradually drift. A worn mold can push mounting points a millimeter or two out of position, which is enough to make fairing bolts bind or refuse to thread.
Material Shrinkage and Thermal Warping
Plastic and composite parts shrink as they cure and cool. If the resin or polymer is not perfectly controlled, individual panels contract at slightly different rates. Add temperature swings during shipping or long-term storage, and thin sections can warp. A panel that was dimensionally correct at the factory may arrive visibly twisted, with its holes in the wrong place.
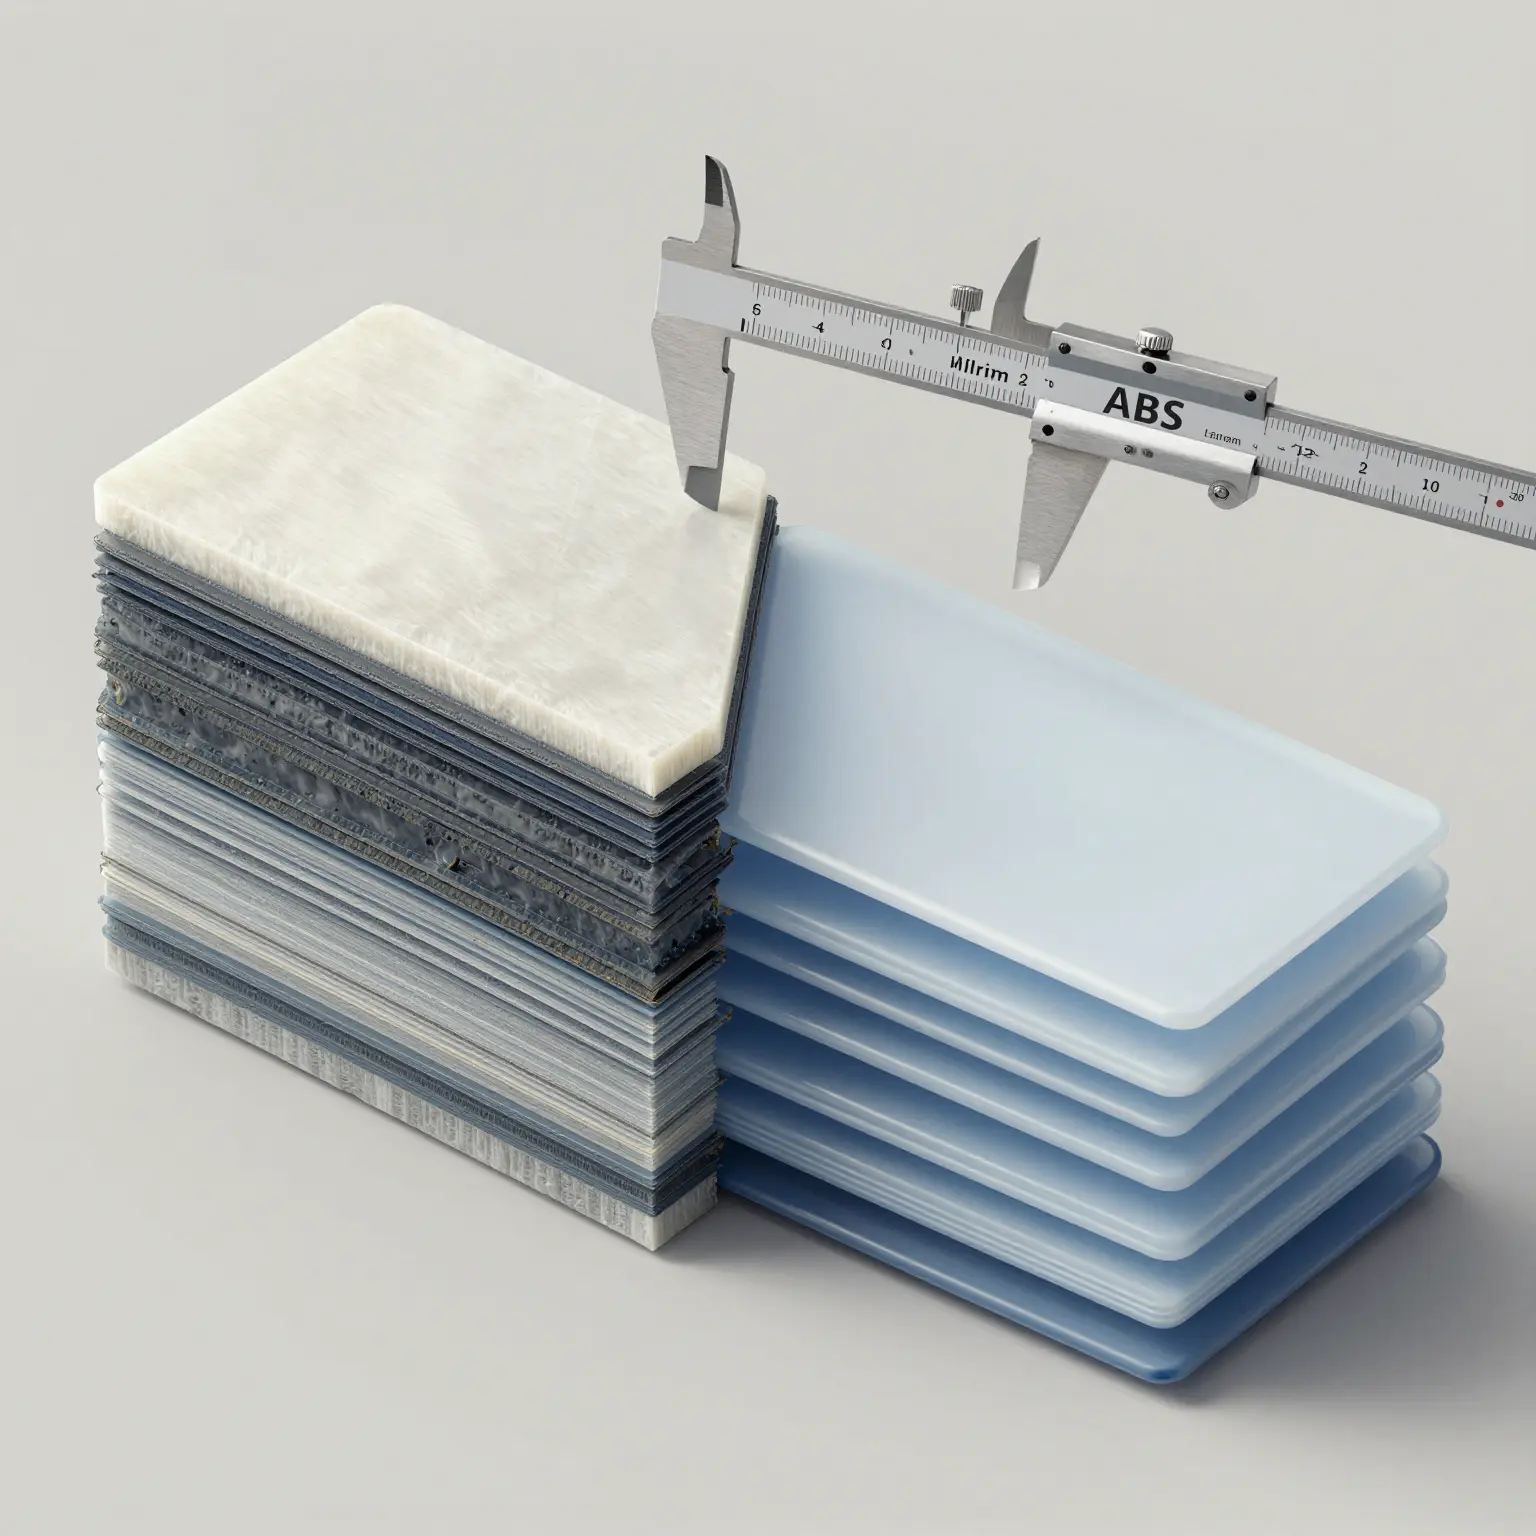
Fiberglass vs. ABS: Thickness Differences
Fiberglass and ABS plastic behave very differently. Fiberglass laminates are often thicker and stiffer, while ABS is thinner and more flexible. Because aftermarket fairing kits are frequently designed for one material and then produced in another, the mounting flange sits at a different depth. That mismatch shifts the alignment of every fairing bolt relative to the frame.
Inconsistent Mounting Tab Placement
Mounting tabs are hand-positioned in many low-volume production runs. If a tab is bonded or molded even slightly off-angle, the attached panel will not sit flush. The error compounds across multiple panels, so the nose section may align while the side fairings refuse to meet.
OEM vs. Aftermarket Design Variance
OEM bodywork is engineered around a specific frame using tightly controlled tooling. An aftermarket fairing is a reverse-engineered approximation, and legitimate design variance is expected. Even a high-quality replica can differ by a few millimeters. That is normal, but it means final fairing fitment often requires trimming, slotting, or shimming. If you are also retrofitting parts onto older machines, expect alignment work to be part of the process.
The Takeaway
Misalignment is not usually a sign of a defective part. It is the predictable result of tooling wear, material behavior, and design compromise. Knowing each cause makes the problem easier to diagnose and correct before painting.
When fairing panels will not line up, bad luck is rarely the reason. The table below lists the most common causes of bolt hole misalignment, what each one looks like, how badly it affects fitment, and the fastest fix.
| Cause | Typical Symptom | Fitment Severity | Recommended Fix |
|---|---|---|---|
| Manufacturing tolerance | Holes off by a few millimeters across multiple fasteners | Low | Enlarge holes slightly with a round file or step drill, then touch up edges |
| Mold variance | One panel fits better than its twin or matching set | Medium | Trial-fit before painting and blend gaps with shims or spacers |
| Thermal warping | Bowed panel that pulls away from flush contact | High | Apply gentle, even heat to reshape, then cool while clamped in place |
| Thick or thin material | Screws sit proud or wobble in loose holes | Medium | Match screw length/thread to panel, add washers on thin sections |
| Mounting tab placement | Tabs sit short, long, or out of plane with the frame | High | Reposition or reinforce tabs, then re-drill to factory anchor points |
| Hardware mismatch | Bolt won’t thread or bottoms out early | Low | Swap to correct pitch, diameter, and length hardware |
Pro tip: Always dry-fit every panel before paint. Catching a misalignment early costs minutes; fixing it after a fresh coat of clear costs a repaint.

Aftermarket vs. OEM Production: Why Bolt Holes Drift
Anyone who has fought a stubborn side panel has asked the same question: why don’t the holes line up? The answer is almost never a defective product. It comes down to how an aftermarket fairing is built compared with the bodywork that rolled off the original factory line. Once you know the differences, what looks like a defect is usually a fixable adjustment.
Two Very Different Manufacturing Worlds
OEM factories pour enormous budgets into steel molds, robotic assembly, and tightly controlled climate chambers. Aftermarket producers work at a smaller scale, using fiberglass, ABS plastic, or digitally scanned molds that keep costs down, especially for discontinued or rare models. Neither approach is “wrong” – they aim at different price points and production volumes.
| Production Factor | OEM Factory | Aftermarket Fairing Maker |
|---|---|---|
| Mold type | Steel molds, high cost | Fiberglass/ABS or scanned molds |
| Tolerance | Near-perfect consistency | Small batch-to-batch variation |
| Cooling & curing | Climate-controlled ovens | Ambient temperature, hand-cured |
| Finish thickness | Uniform, thin gel coat | Thicker, hand-laid layers |
| Bolt hole alignment | Factory-perfect | Minor trimming often required |
Why These Differences Shift Bolt Holes
- Molds: A steel OEM mold can stamp thousands of identical panels before it wears. Aftermarket molds are lighter and cheaper, so tiny dimensional changes creep in between runs.
- Cooling and curing: When resin cures in an uncontrolled workshop, it shrinks unevenly. That shrinkage pulls the whole panel – and every hole – slightly off.
- Quality control: OEM lines measure panels automatically. Aftermarket shops often inspect by hand, so a small offset can slip through unnoticed.
- Finish thickness: A heavier gel coat or extra fiberglass layers add a few millimeters of material that can nudge a bolt hole out of position.
None of this means your fairing fitment is doomed. It means the panel is essentially 95% correct and needs a gentle nudge to reach 100%. A quick re-drill, a slightly enlarged hole, or a thin shim is standard practice in workshops everywhere – hardly the mark of a bad product.
Getting It Right Before You Paint
Dry-fit everything and test each bolt before you reach for the spray gun. If a hole will not cooperate, it is usually an alignment quirk rather than a bad panel. Suppliers who handle thousands of motorcycle fairing styles have seen most of these problems before and can tell you which adjustments are routine and which warrant a replacement. A few minutes of fitting now prevents a repaint later.
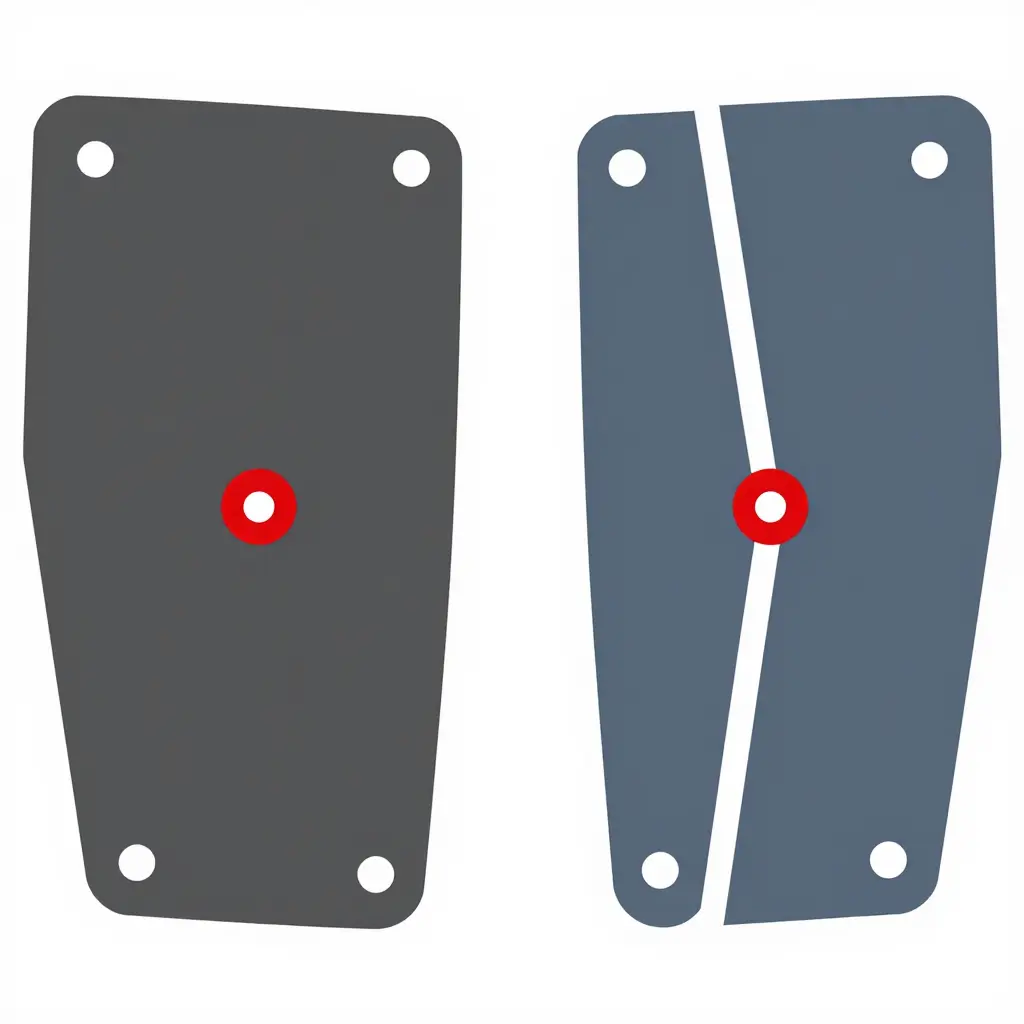
Pre-Paint Diagnostics and Inspection
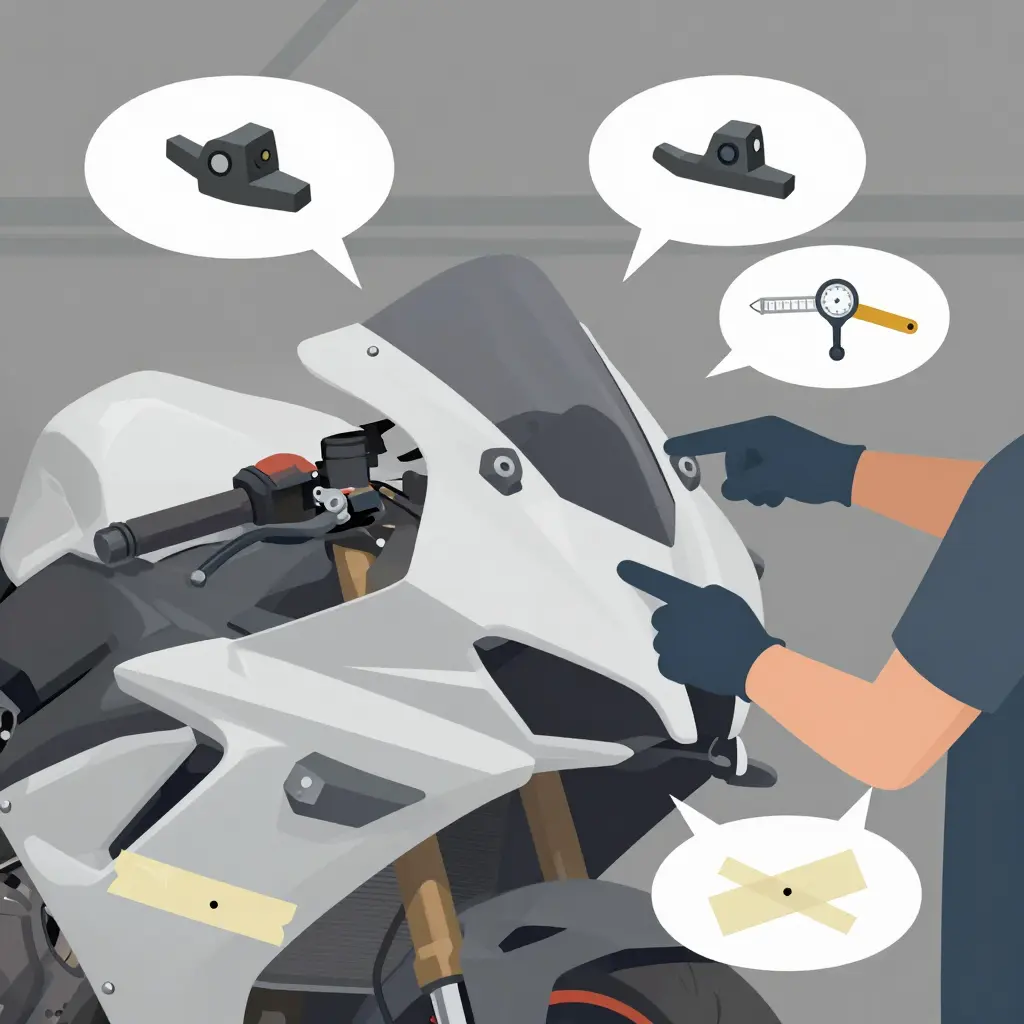
Paint does not fix fitment; it freezes it. Once primer and clear coat cure over a panel that sits crooked, every gap and every drilled-in-a-hurry hole becomes permanent. Run a full dry-fit inspection on the bare, unpainted panels before you mix any color.
Dry Fit Every Panel First
Assemble the complete set – nose, sides, tail, belly pan – with the fasteners left loose. Work slowly and let the panels find their natural resting position instead of forcing them. If you have to muscle a panel into place now, you will fight it later. This is also where good retrofitting aftermarket components habits pay off.
Check Mounting Tabs and Bolt Hole Alignment
This is where trouble usually shows up. Tabs and clips rarely land where the factory spec promised, and it does not take much for bolt holes misalign across the set. Snug one bolt finger-tight, then check whether the neighboring holes still line up. Never drill to “make it work” yet – diagnose first.
- If a hole is off by more than the washer can hide, note it and move on.
- If a tab is too short or bent, flag it before it cracks under tension.
Hunt for Stress Points and Gaps
Run your fingers along every seam and look for panels that bow or bind. Uneven gaps, a panel that pops out of a clip, or a seam that pinches all point to the same thing: fairing fitment is fighting the frame. Poor motorcycle bodywork alignment like this leads to cracks, buzzing, and vibration damage once you hit the road.
Mark Offset Holes with Tape
Before removing anything, mark the problem. Stick a strip of masking tape over each misaligned hole and draw the true center with a marker. That tape becomes your map when you enlarge or slot the hole on the bench – far easier than guessing after the panels come off.
Why Painting First Locks In the Defects
Paint hides nothing. A gap that looks small on bare plastic becomes a glaring shadow line under gloss, and a stressed tab will still crack under a fresh coat. Verify fitment thoroughly, fix it, re-fit it, and only then commit to color.
How Often Each Factor Causes Fairing Misalignment
Before you reach for a drill or a file, it helps to know what actually pushes those bolt holes out of line. The blame rarely falls on a single culprit. Manufacturing tolerance is the most common offender, showing up in roughly a third of fitment complaints, followed by where the mounting tabs were placed during production and the way plastic and fiberglass panels warp under heat. Material thickness differences and hardware mismatches round out the picture, each one nudging alignment off by a millimeter or two at the mounting points.
The bar chart below estimates how frequently each factor triggers fairing misalignment, based on common shop-floor patterns. Use it as a quick diagnostic cheat sheet: if your gaps are uneven along the whole panel, tolerance is the likely suspect, whereas a single stubborn hole usually points to a warped section or the wrong fastener.
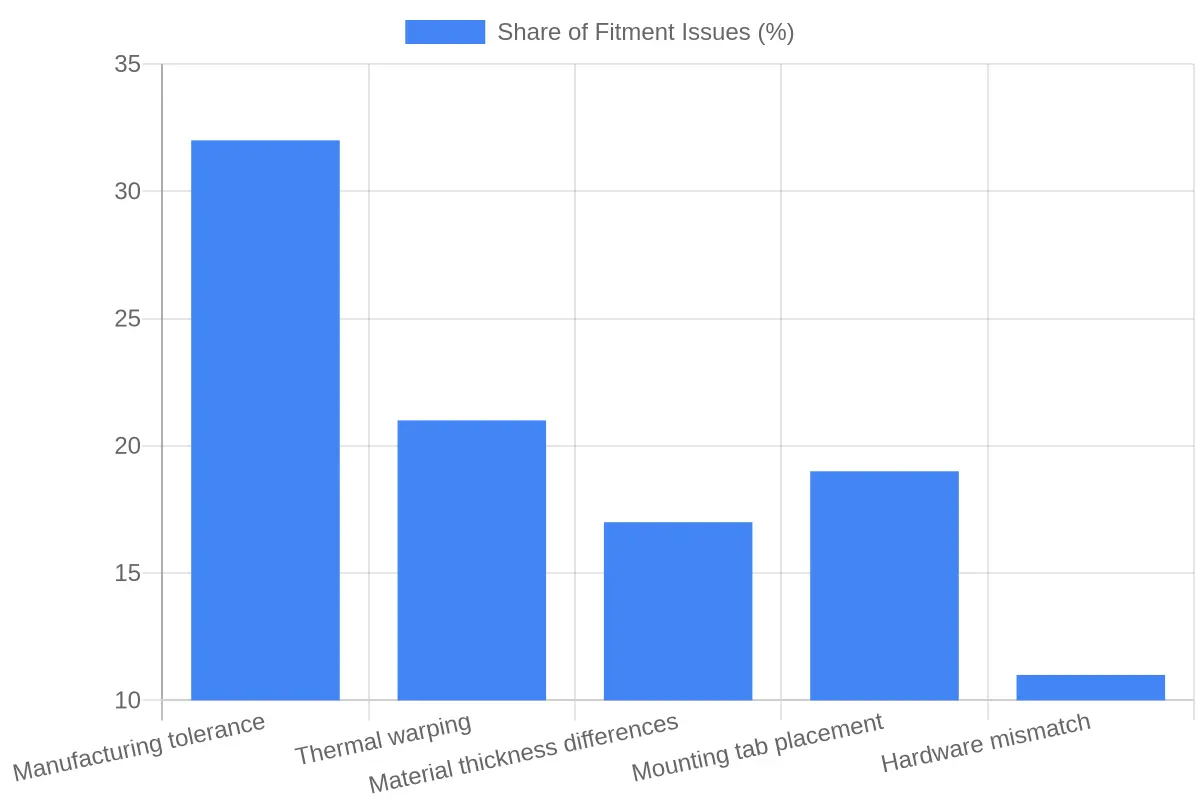
A single fastener that refuses to thread is rarely a random mystery. Once you know which forces are most often at play, you can test each cause in order and fix the real problem before the paint gun comes out.
Step-by-Step Fix Procedure: Getting Your Motorcycle Fairing to Line Up
Work through this sequence in order before you pick up the spray gun. Rushing prep is the fastest way to waste a fresh paint job on a panel that never sat flush. The same order applies whether you are chasing a stubborn gap on a track build or dialing in real-world aftermarket fairing fitment on a classic restoration.
-
Dry fit and mark the misaligned holes. Mount the panel loosely and thread the fairing bolts in by hand, never forcing them. Use a marker or a strip of painter’s tape to flag every hole that refuses to line up with its mounting tab or grommet.
-
Choose the correct correction method. If a hole is off by only a millimetre or two, a light file is usually all you need. If the gap is larger, or the panel itself is warped, plan to slot the hole and use controlled heat instead.
-
Lightly file or slot the hole. Wrap a fine round file and remove material in small, even strokes, checking the fit constantly. Your goal is to extend the hole just enough that the fastener sits without tension, not to carve a gaping slot.
-
Apply controlled heat to reshape warped areas. When a motorcycle fairing has bowed, warm the offending section with a heat gun on its lowest setting, moving in slow circles. Gently flex the plastic back toward its original shape and hold it until it cools.
-
Refit and test alignment. Reinstall the panel and snug every fairing bolt down by hand first. Only tighten to spec once you confirm all holes engage cleanly and the panel gaps look even.
-
Repeat if needed. If a hole still fights you, repeat the file-and-heat cycle in tiny increments. Small, repeated adjustments beat one aggressive cut every time.
-
Proceed to painting only after the fit is perfect. A panel that will not mount cleanly will not paint cleanly either. Confirm the alignment is solid before you apply any primer or color, then move on to finishing.
Heat Reshaping and Safe Slotting Techniques
Even a well-made aftermarket fairing can fight you during final fitting. When a bolt hole sits a few millimeters off, heat reshaping and careful slotting are the two most reliable fixes, and both are gentler on your paint than forcing a panel into place.
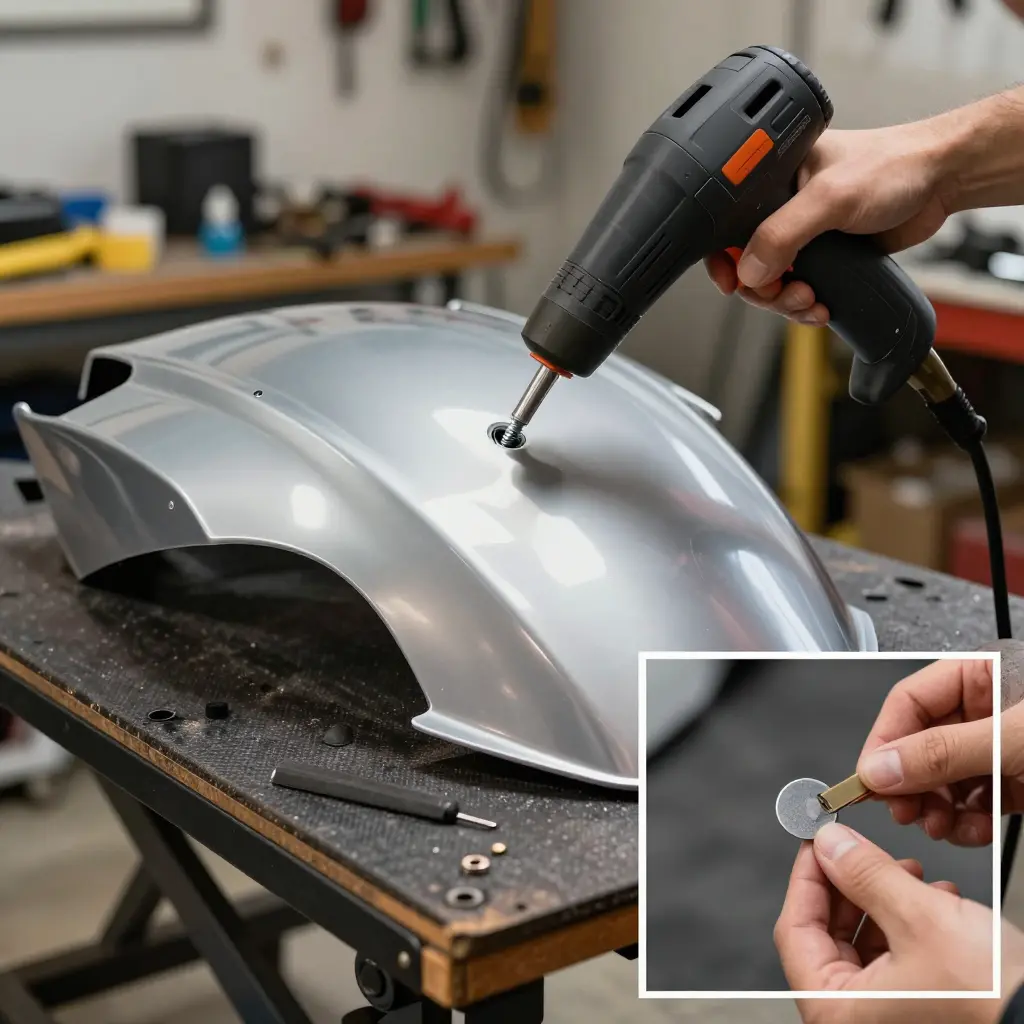
Softening With a Heat Gun
Thermoplastic fairings (most ABS plastics) become pliable when warm, which is what makes heat reshaping possible. The trick is patience, not power.
Start with your heat gun on its lowest setting and hold the nozzle two to three inches from the panel. Sweep the gun continuously, never parking it in one spot, so the plastic heats evenly instead of blistering. Most ABS panels begin to soften between 180F and 220F (82-104C).
Before applying any pressure, support the panel. Lay it on a padded bench or a soft towel so the softened material does not sag under its own weight or distort the areas you want to keep flat.
Once the panel is warm and flexible, press gently and evenly with gloved hands to nudge the mounting point into alignment. Let it cool completely in position, which you can speed up with a damp cloth, then test-fit again before reheating. Most fairing fitment headaches disappear after one or two careful cycles.
Enlarging and Slotting Bolt Holes
Sometimes reshaping is not enough and a hole needs more room. A slot gives the bolt travel room without leaving oversized gaps.
Clamp the panel firmly, then use a small round file or a step drill bit to widen the hole gradually. Work from the back side to avoid chipping the primer or topcoat. Remove a little material at a time and re-check the fit often.
To keep strength, keep the slot short, usually no more than 5-8mm, and never enlarge it beyond the footprint of the bolt head or washer. Reinforce the slotted area afterward with a generous washer or a small patch of fiberglass-reinforced tape or epoxy on the back side. That spreads the load and stops cracks from starting at the new edge. A well-reinforced slot is stronger than a hole drilled so large it has nothing left to bite into.
Safety Notes
- Always wear safety glasses and heat-resistant gloves.
- Work in a well-ventilated area and keep the heat gun away from fuel lines, wiring, and anything flammable.
- Never overheat the panel. If it glosses, smokes, or smells acrid, back the gun off immediately.
- Unplug the heat gun when it is not in use and rest it on a non-flammable surface to cool.
- Take breaks so you do not burn yourself or warp the panel through impatience.
Done carefully, these techniques turn a bolt-hole misalignment into a clean, factory-looking result. Whether you are fitting a budget aftermarket fairing or matching an original, a little heat and a steady hand go a long way. If you also enjoy reviving older machines, our guide to sourcing and retrofitting vintage vehicles covers the planning side of bigger projects.
The Fitment Troubleshooting Flow at a Glance
Follow a fixed order of operations before you reach for sandpaper or a spray gun. Painting first usually locks in a misalignment you cannot undo, so treat this sequence as your checklist. The diagram below traces the path from the first dry fit to final alignment, just before the fairing goes to paint.

Following the flow left to right keeps you from chasing problems out of order. Each step builds on the last, so a snug, correctly aligned panel comes from patience rather than force. If you enjoy the hands-on side of reviving older machines, the same careful approach applies to sourcing and retrofitting vintage vehicles.
Final alignment is only trustworthy once every earlier step has been confirmed.
Surface Preparation and Pre-Paint Adhesion
Paint magnifies everything underneath it. Nailing your fairing fitment only gets you to the starting line; the finish depends on the prep you do next.
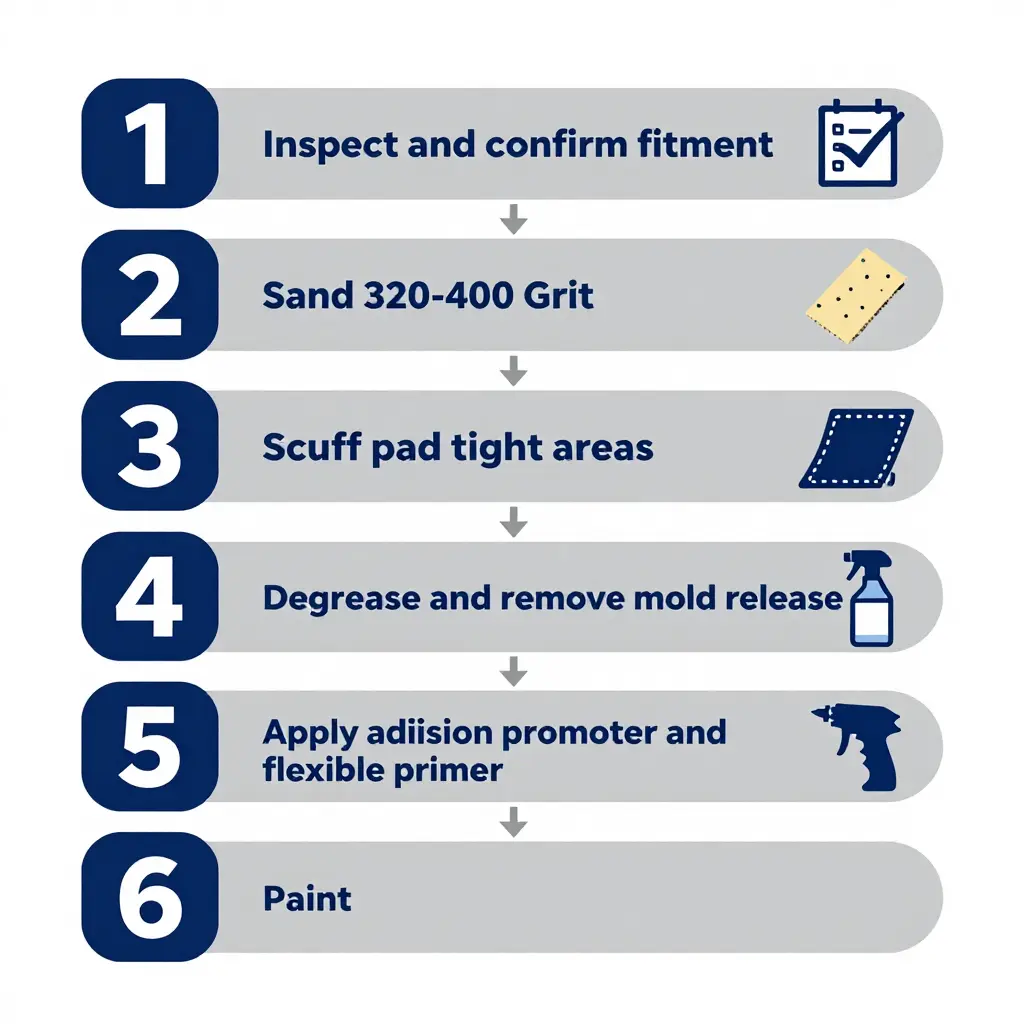
Sand, Scuff, and Break the Gloss
A brand-new aftermarket fairing panel usually arrives with a slick mold finish or factory sheen that paint simply slides off. Grab 320- to 400-grit paper to flatten orange peel and minor mold flash, then step up to 600- to 800-grit wet sanding for a uniform, toothy surface. Reach the tight curves and recessed bolt-hole edges with a scuff pad rather than forcing sandpaper into places it can’t go.
Strip the Invisible Enemies
New panels are coated in mold release agents, and used motorcycle fairing sets carry years of road grime, silicone polish, and oily fingerprints. Any of these will cause fisheyes, cratering, and weak adhesion. Wash with warm water and a mild detergent, then wipe down with isopropyl alcohol or a dedicated wax-and-grease remover. Wear nitrile gloves from here on; your bare hands reintroduce oils the moment you touch the surface.
Prime for Flex, Not Just Color
A rigid, high-build primer sprays nicely on metal but cracks the instant a plastic panel flexes. Apply a dedicated adhesion promoter first, then a flexible primer designed to move with the panel. Lay down two or three light coats, letting each flash fully, and never chase a wet, glossy film in one pass.
Why Flex Agents Matter on Plastic Fairings
Flex agents keep the primer and topcoat elastic, so they stretch with the panel instead of fracturing along stress points. Fairing edges, mounting tabs, and clip zones flex constantly from vibration and heat cycling. Without a flex additive, that hidden movement shows up as spiderweb cracks in a season or two.
Prep Steps at a Glance
- Wash the panel with warm water and a mild detergent to remove dust and grime.
- Degrease with isopropyl alcohol or wax-and-grease remover, using fresh lint-free cloths.
- Sand with 320- to 400-grit, then refine to 600- to 800-grit wet.
- Scuff recessed areas and troublesome bolt-hole edges with an abrasive pad.
- Re-clean the surface and keep gloved hands off the panel.
- Spray a thin, even coat of adhesion promoter and let it flash.
- Apply two to three light coats of flexible primer, then block-sand smooth.
Get this groundwork right and your aftermarket fairing will hold a durable, factory-quality finish. For more on tackling older machines before you start spraying, see our advice on reviving classic restoration projects.
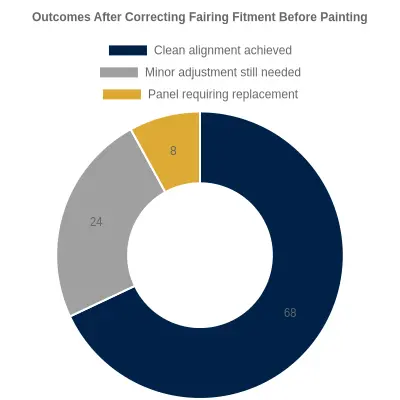
It helps to know what a realistic outcome looks like before you reach the paint booth. Based on typical aftermarket fairing projects, roughly two-thirds of fitment jobs end with clean, flush alignment after careful slotting and shimming – panels that sit tight and lines that finally agree with each other.
About a quarter of the time one stubborn mount still needs a second pass: an enlarged hole, a trimmed tab, or a shim washer you missed the first time around. That is normal. The remaining small share is the panel that cannot be rescued, where replacement makes more sense than forcing a bad piece to comply.
Frequently Asked Questions About Aftermarket Fairing Fitment
1. Are misaligned bolt holes actually normal on a new kit?
Yes, minor misalignment is something most riders run into with aftermarket fairing fitment, especially on replica panels molded from an original part rather than stamped by the factory. Because molds wear over time and every bike’s frame holds slightly different tolerances, bolt holes misalign by a few millimeters in many kits. A small amount of adjustment is completely normal; widespread or extreme misalignment usually points to a poor-quality set of panels.
2. Should I paint my fairings before or after test-fitting them?
Always dry-fit and adjust your motorcycle fairing before any paint touches it. If you paint first and then discover the bolt holes misalign, you will scrape, crack, or chip that fresh finish while forcing panels into position. Fit everything, correct the alignment, and only then hand the panels to your painter.
3. How much misalignment is actually acceptable?
An offset of roughly 1-2 mm per bolt hole is generally fine and can be solved with light filing or slotting. If you need to shift a hole by more than 4-5 mm, or panels simply refuse to sit flush, the part is likely poorly molded and worth returning. Anything that forces you to bend the frame or overtighten bolts is a clear red flag.
4. Does heat reshaping damage fairings?
Heat reshaping, done carefully, does not damage ABS or fiberglass panels, but overheating certainly does. Using a heat gun at a moderate temperature with gentle, even pressure lets you relax a panel into shape without stressing it. If you scorch, bubble, or over-soften the plastic, the panel can warp permanently or lose structural strength.
5. When should I enlarge a hole instead of slotting it?
Enlarge (drill out) a hole only when the offset is small and consistent and there is enough material left around it to stay strong. Slot a hole into an oval when you need adjustability or when the misalignment varies from panel to panel. Slotting preserves more of the mounting boss and gives the panel a little room to move during final assembly.
6. How do I choose a reliable aftermarket fairing supplier?
Look for suppliers who publish real fitment photos, offer clear return policies, and answer questions about mold quality. Reading rider reviews and comparing panel thickness and mounting tabs tells you a great deal about consistency. The same care you’d apply when sourcing and restoring vintage vehicles applies here: a trustworthy supplier stands behind its aftermarket fairing fitment and will replace defective panels.
Conclusion: Fix Fairing Fitment Before You Touch the Paint
Getting your fairing fitment right before painting is not a cosmetic nicety – it is the difference between a crisp, factory-looking finish and an expensive do-over. Paint is unforgiving. Once a panel is drilled, coated, and cured, every millimeter of misalignment becomes permanent, and re-cutting a freshly painted surface usually means sanding it all back down. That is why experienced builders dry-fit their aftermarket fairing first and reach for the spray gun second.
Misaligned bolt holes are extremely common on aftermarket panels, and they are almost always correctable. Warping, shipping stress, and loose manufacturing tolerances all play a role, but a little patience solves most of it.
Remember the diagnosis-and-fix sequence: dry-fit and identify the problem holes, check the panel for warp or twist, slot or gently enlarge the stubborn holes, shim and adjust the mounting points, then re-test the whole set before any paint is mixed. Follow that order and your motorcycle fairing will sit flush and gap-free.
If you’d rather start with panels that already fit well, a trusted supplier of over 3,000 motorcycle fairing styles offers fast support, competitive pricing, and answers within six hours – so you can spend your time painting, not fighting brackets. For more on sourcing quality parts, see this guide to sourcing and retrofitting vintage vehicles.
Quick Pre-Paint Checklist
- Dry-fit every panel on the bike before any prep work
- Circle and label every misaligned or tight bolt hole
- Check each panel for warp, twist, or shipping damage
- Slot or carefully enlarge holes, then smooth the edges
- Shim and adjust mounts to close uneven gaps
- Re-test the full fairing set with all fasteners loosely seated
- Confirm clearance for forks, levers, and exhaust routing
- Wipe down, degrease, and only then begin priming